
To deep clean grout and tile in a beach house requires understanding the coastal environment. To deep clean grout and tile in a beach house requires understanding conditions that inland properties rarely face. Salt air, high humidity, sandy feet tracking through wet bathrooms, and the constant cycle of condensation from coastal temperature shifts all accelerate the discoloration and deterioration of grout lines and tile surfaces.
If your beach house tile looks dingy, a proper effort to deep clean grout and tile will address the root cause. If your beach house tile looks dingy despite regular cleaning, you need to deep clean grout and tile rather than simply maintain the surface, the issue is almost certainly the grout. Grout is porous, and in a coastal environment, it absorbs moisture, salt residue, and mold spores faster than in drier climates. A true deep clean of grout and tile requires more than a spray-and-wipe routine.
Why beach house tile grout needs special attention
When you deep clean grout and tile, you are addressing a material that absorbs everything. When you deep clean grout and tile, you are working with a material made of cement, sand, and water. When unseal, it acts like a sponge. In a beach house environment, this means salt particles from the air, mineral deposits from shower water, soap scum, and mold spores all penetrate the grout surface rather than sitting on top of it.
Over time, this build-up changes the color of the grout from its original tone to gray, brown, or black. On Martha’s Vineyard, where many homes sit close to the water and are exposed to consistent humidity and salt air, this process happens faster than in inland homes. The result is tile that looks dirty even when it is technically clean on the surface.
Additionally, mold and mildew thrive in the porous structure of unsealed or deteriorated grout. This is not only an aesthetic problem. Mold in grout affects indoor air quality and can cause health issues, particularly for guests with respiratory sensitivities.
What you need to deep clean grout and tile
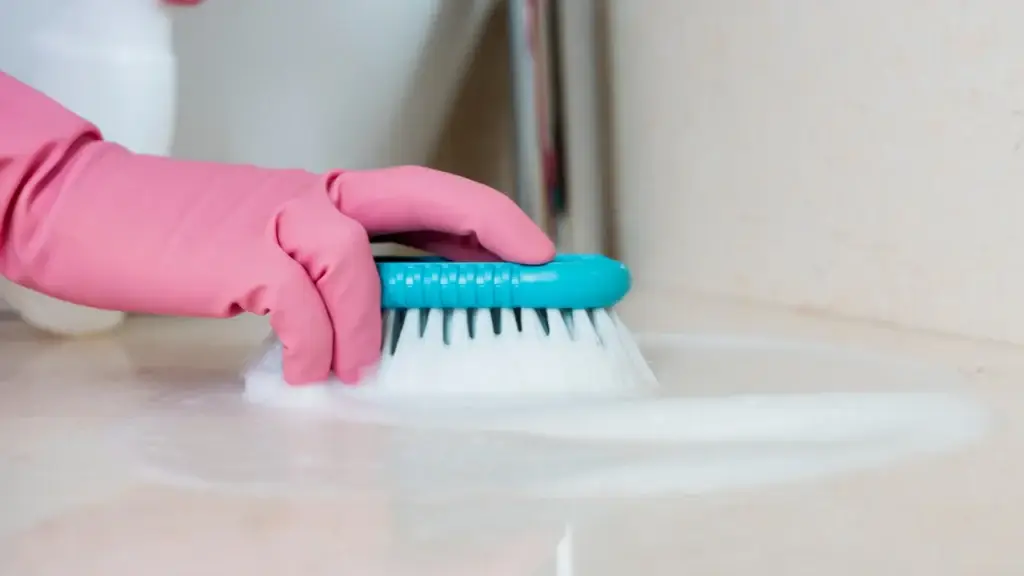
Gather the right tools and supplies before starting. Using the wrong tools makes the process less effective and can damage tile surfaces.
Supplies:
- Baking soda
- White vinegar or hydrogen peroxide (not both at once)
- A commercial grout cleaner for heavy staining
- A stiff grout brush or old toothbrush
- Microfiber cloths
- A bucket
- Protective gloves
- A squeegee for finishing large tile walls
For natural stone tile, including marble or travertine, avoid acidic cleaners such as vinegar. Acids etch natural stone permanently. Use a pH-neutral stone cleaner instead.
Step-by-step: how to deep clean grout and tile
Step 1: Dry clean the surface first
Before applying any liquid cleaner, sweep or vacuum the tiled area to remove loose grit, sand, and hair. In a beach house, sand is particularly common in bathroom floors. Skipping this step means you will be working wet sand into the grout lines as you scrub.
Step 2: Apply the cleaning solution to the grout
To deep clean grout and tile at moderate staining levels, apply a paste of baking soda and water directly to the grout lines using a stiff brush or your fingers. The paste should be thick enough to stay in the grout line rather than running off immediately.
For heavier staining or mold, spray hydrogen peroxide over the baking soda paste. The fizzing reaction helps lift stains from the porous grout surface. Allow the solution to sit for 10 to 15 minutes before scrubbing.
For grout that has years of accumulated staining, a dedicated commercial grout cleaner will deliver better results than a baking soda approach alone. Look for a product specifically rated for the type of tile you have and follow the manufacturer’s instructions for dwell time.
Step 3: Scrub the grout lines
The scrubbing step is the most important part when you deep clean grout and tile. Use a stiff grout brush to scrub along each grout line in a back-and-forth motion. Work in sections and keep the brush moving along the line rather than across it. Apply pressure consistently. The scrubbing action is the mechanical core of how you deep clean grout and tile effectively.
A clean toothbrush works well for corners and tight areas around fixtures.
Change your water or cleaning solution as it becomes cloudy. Dirty water redistributes the staining you are trying to remove.
Step 4: Clean the tile surface
After scrubbing the grout, address the tile surface itself. Wipe down the tile with a diluted all-purpose bathroom cleaner appropriate for the tile material. Use a microfiber cloth for ceramic and porcelain. For natural stone, use only a pH-neutral product.
Pay attention to the areas around soap dishes, showerhead fixtures, and faucet bases. Mineral deposits concentrate in these spots and require a targeted wipe with a descaling solution.
Step 5: Rinse thoroughly
Rinse the entire tiled area with clean water, starting from the top and working downward. Leftover cleaning solution residue contributes to soap scum build-up and can leave a film on the tile surface. A thorough rinse prevents both.
Use a squeegee on large tiled walls and floors to remove the rinse water quickly. This also helps you spot any areas that need additional attention.
Step 6: Dry the surface completely
Dry the tile and grout as completely as possible after rinsing. In a beach house environment, leaving moisture in the grout lines accelerates mold re-growth. Use a dry microfiber cloth for walls and a dry towel or squeegee for floors.
Where possible, open a window or run the exhaust fan for at least 30 minutes after cleaning to reduce residual humidity.
Beach house tile care: maintaining results after a deep clean
Apply a grout sealer
After you deep clean grout and tile, applying a grout sealer significantly slows future staining. significantly slows future staining and moisture absorption. Grout sealers fill the pores in the grout surface and create a barrier against salt, soap, and mold.
Apply a penetrating silicone grout sealer according to the product instructions. Most residential grout sealers require reapplication every 12 to 24 months, depending on usage. In a beach house with heavy guest traffic, plan to reseal annually.
Use a squeegee after every shower
The single most effective habit for preventing grout staining in a beach house bathroom is squeegee-ing the walls after every shower. This removes the water that would otherwise evaporate and leave mineral deposits behind. It takes less than a minute and dramatically reduces how quickly grout re-stains.
Improve bathroom ventilation
Run the exhaust fan during and for at least 20 minutes after every shower. If the ventilation fan is inadequate, consider upgrading it. Poor ventilation is one of the primary reasons coastal bathroom grout deteriorates quickly.
When professional grout cleaning service is the right choice
When you need to deep clean grout and tile that has been neglected for multiple seasons,, DIY cleaning may not produce a satisfactory result. Deeply embedded staining, significant mold penetration, or damaged grout that requires repair rather than just cleaning are all situations where a professional cleaning service delivers better and safer results.
Professional grout cleaning uses higher-concentration cleaning agents, specialized equipment, and techniques that are not available in standard consumer products. The results are more thorough and last longer.
ICP Cleaning Services provides deep cleaning services for Martha’s Vineyard beach houses and vacation homes, including bathroom tile and grout restoration as part of pre-season and post-season deep cleans. Our team is familiar with the specific challenges of coastal tile care and uses methods appropriate for the environment.
For vacation rental properties, professional tile care is also a guest experience investment. Clean, bright grout in a bathroom signals a well-maintained property. Stained, moldy grout does the opposite, regardless of how beautiful the rest of the home is.
Grout color restoration: when cleaning is not enough
Sometimes the goal is not just to remove staining but to restore grout to its original color. This is particularly relevant for older beach house bathrooms where the grout has been discolored for years and cleaning alone cannot fully reverse the change.
Grout paint and colorant: Grout colorant products, sometimes called grout paint, penetrate the grout surface and deposit a new color layer. They are available in a wide range of colors and can be used to restore faded grout to its original tone or to change the color entirely if desired.
Applying grout colorant requires the grout to be thoroughly clean and dry before application. Any surface residue, including cleaning product traces, prevents proper adhesion. This is why a professional deep clean of the grout immediately before colorant application is the right sequence.
Grout replacement: For grout that is cracked, crumbling, or has significant mold penetration below the surface, cleaning and colorant are not the solution. The grout needs to be removed and replaced, a process called regrouting. This is a job for a tile professional, not a cleaning service, but it often begins with a cleaning assessment that reveals the extent of the damage.
In a beach house environment, regrouting is typically needed every 10 to 15 years in bathrooms, depending on the quality of the original installation, the level of humidity the bathroom experiences, and how consistently it has been maintained. Properties that have never had their grout sealed and cleaned professionally may reach this point sooner.
Grout maintenance schedule for beach house bathrooms
Establishing a consistent maintenance schedule is the most effective long-term strategy to deep clean grout and tile efficiently. for beach house tile care. The following schedule reflects the demands of a coastal property with regular use.
After each shower: Squeegee the walls. This removes the mineral-laden water before it evaporates and deposits.
Weekly: Spray the shower walls and floor with a daily shower spray or a diluted all-purpose cleaner. This prevents soap scum from bonding during the week between scrubs.
Monthly: Scrub grout lines with a dedicated grout brush and an appropriate cleaner. This prevents the monthly build-up from becoming a seasonal project.
Annually: Apply a penetrating grout sealer after a thorough clean. For high-use beach house bathrooms, twice per year may be appropriate.
Every two to three years: Book a professional deep clean of grout and tile that addresses any accumulated build-up and checks the condition of the sealer. Reseal if needed.
For vacation rental properties where you need to deep clean grout and tile after heavy summer use,, the monthly scrub should be incorporated into the turnover rotation rather than treated as a separate task. ICP Cleaning Services addresses grout maintenance as part of the regular cleaning services we provide on an ongoing basis for rental properties.
Deep clean grout and tile: your beach house will show the difference
Choosing to deep clean grout and tile on a consistent schedule is one of those maintenance decisions that pays off significantly. Grout and tile care is one of those maintenance tasks that becomes much harder the longer it is deferred. Regular surface cleaning keeps the tile looking clean day to day, but only a genuine deep clean removes the salt, soap, and mold that accumulate in the grout structure over time.
For Martha’s Vineyard beach houses, the coastal environment accelerates this process, which means the maintenance schedule needs to be more frequent than standard guidance suggests. A deep clean of grout and tile at least twice a year, at the start and end of the summer season, keeps the bathrooms in a condition that guests notice positively.